
Standard photo sizes include everyday prints like 4×6 inches and passport shots at 2.5×2 inches. Choosing the correct size keeps websites speedy and images sharp—oversized pics slow things down, while tiny ones look fuzzy. Aspect ratio is the shape of your photo (think 16:9 widescreen), and common ratios like 1:1 (square) or 3:2 (DSLR) fit different screens and prints. For print sizes, ratios like 3:2 for 4×6″ or 4:5 for 8×10″ matter—mismatch them, and your photo gets cropped.
Different print sizes like 4×6″, 8×10″, or 12×12″ (square) suit albums, frames, or wall art. Resolution needs hit 300 PPI for crisp prints (e.g., 1200×1800 pixels for 4×6″). Square, large, or panoramic prints range from Instagram-friendly squares to wide 24×60″ posters. Social media sizes vary: Facebook covers use 851×315 pixels, while Instagram posts fit 1080×1080. Web images work best at 1200-1600 pixels wide with small file sizes (<500KB). Photoshop resizing uses the Image Size tool to tweak dimensions, resolution, and aspect ratios.
Standard Photo Sizes are crucial. Large images slow down page loading speeds, negatively impacting SEO and causing viewer attrition (when users leave the page). Therefore, it’s essential to reduce file sizes. Profile and stock photos are often more significant than necessary for display purposes.

In today’s digital age, capturing moments is common, but turning them into physical prints holds a unique charm. Standard Photo Sizes are essential for several reasons: they define the photo’s purpose, influence its aesthetics, determine its suitability for display, and affect printing costs. Whether you’re creating an album, decorating a space, or curating a professional portfolio, the size of the photo significantly impacts its effectiveness. From evoking emotions to managing expenses, photo print sizes are critical to preserving, presenting, and perceiving memories.
What Are the Standard Photo Sizes?
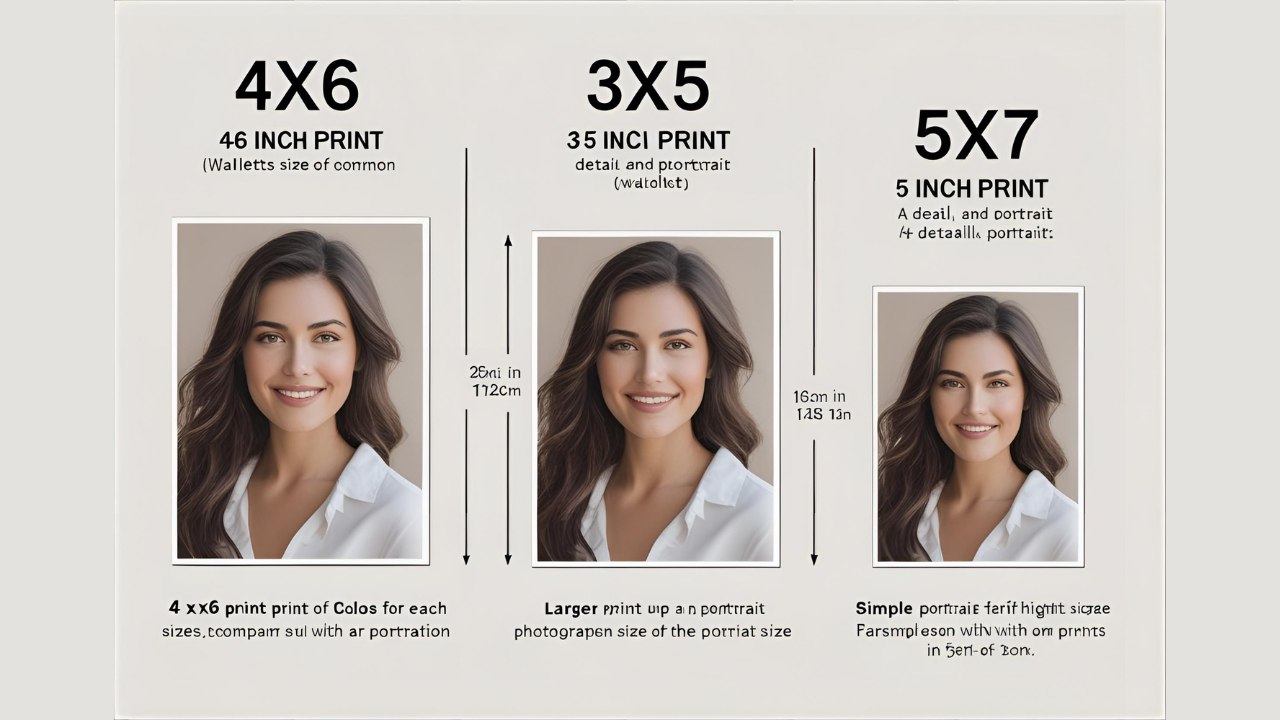
Standard photo print sizes include 4×6 inches (most common), 5×7 inches, 8×10 inches, 11×14 inches, and 16×20 inches. Passport photos use a specific standard size of 2.5×2 inches. These sizes are popular for everyday prints, albums, and framing.
Print Sizes Perspective:
Standard photo prints range from small sizes like postcard (about 3.5×5.5 inches) to large posters (20×30 inches or bigger). The most popular choices are 4×6, 5×7, 8×10, 11×14, and 16×20 inches. You’ll often see these for albums or displays.
Framing Perspective:
Common picture frames match popular photo sizes: 4×6, 5×7, and 8×10 inches. The 4×6 size is especially handy—it’s not too big or small, fits most digital/phone camera pics (2:3 aspect ratio), and has tons of frame options. Bigger prints like 11×14 or 16×20 work well as posters.
Usage Perspective:
The “standard” size depends on how you use the photo. Passports need 2.5×2 inches. Social media profile pics are often square. Feature photos online might be 900×500 pixels. For prints, 4×6 or 5×7 is classic for albums or greeting cards. Think about where you’ll show your photo to pick the best size.
Technical Perspective:
Aspect ratio (like 2:3 for 4×6) is key to understanding these sizes. Sizes like 4×6 are also called 4R. International standards (ISO 1008) list sizes in millimeters, but inch-based sizes are widely used. Sizes vary slightly between “nominal” and “effective” measurements.
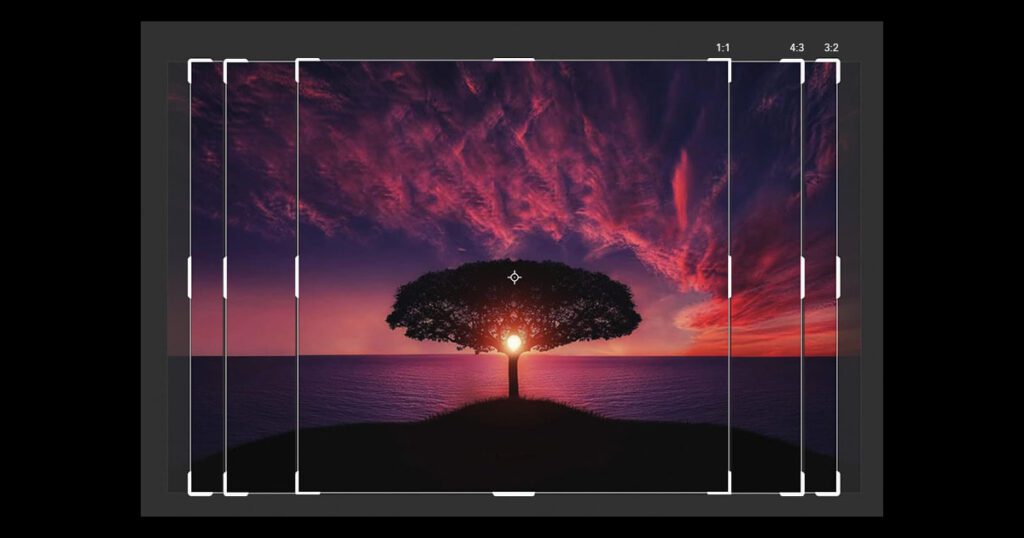
What are the Common Aspect Ratios?
Common aspect ratios include 1.85:1 and 2.39:1 for movies, 4:3 and 16:9 for TV, 3:2 and 5:4 for photos, plus 1:1 for squares, 9:16 for phones, 21:9 for gaming, and 2:1 for filmmakers.
For cinematography: Movies often use wide formats like 1.85:1 and the super-wide 2.39:1. These create that big-screen feel you see in theaters.
In television and monitors: The old standard 4:3 box shape was common for older TVs. Today, 16:9 is the standard widescreen look for HDTVs, computer screens, and presentations. 21:9 is an extra-wide version popular with gamers.
For still photography: 3:2 is classic, coming from 35mm film and used in many digital cameras. 5:4 is often used for art prints like 8×10 photos. 1:1 makes a perfect square, great for Instagram posts and profile pics.
For mobile and social media: 9:16 is the tall, vertical format you see everywhere on phone stories (Instagram, TikTok). It fits your smartphone screen perfectly.
Specialized formats: Some directors like 2:1, seen as a middle ground between cinema and TV formats.
Always pick the right aspect ratio for your project – it keeps your images and videos looking sharp and professional on any screen!
What is the Aspect Ratio for Print Sizes?
The most common aspect ratios for print sizes are 3:2, 4:5, and 5:4. Specific examples include:
3:2 ratio: Fits 4×6 inch prints (standard for DSLRs), also 12×18, 16×24, 20×30 inches.
4:5 ratio: Used for 8×10 and 16×20 inch prints.
5:4 ratio: Also for 8×10 and 16×20 inches.
Other popular ratios: 2:3 (24×36″ posters), 3:4 (30×40″ prints), 5:7 (5×7″ photos).
Matching Ratios to Sizes is Critical
Each print size demands a specific aspect ratio. For example, a 4×6″ print requires a 2:3 ratio image. An 8×10″ print needs a 4:5 ratio. If your image’s ratio doesn’t match the paper, cropping will occur. You’ll lose parts of your photo.
Camera vs. Print Ratios Often Differ
Most DSLR cameras shoot in 3:2 ratio (like 4×6″). But popular print sizes like 8×10″ (4:5) or 5×7″ (5:7) use different ratios. Printing a 3:2 image at 8×10″ means cutting off significant edges to fit.
Cropping is the Big Consequence
Printing with mismatched ratios forces cropping. Imagine a family photo: printing a 3:2 image at 16×20″ (4:5) might chop off elbows or backgrounds. The knowledge base shows a 3:2 photo losing 20% width to become 4:5.
Specialty Ratios Exist Too
1:1 (Square): Think 6×6″ or 12×12″ prints.
1:2 (Panoramic): Sizes like 6×12″ or 8×16″.
16:9: Mostly for video, not standard prints.
Before delving into Standard Photo Sizes, it’s vital to grasp the concept of aspect ratio. Understanding aspect ratio is the key to comprehending standard photo sizes.
What is the aspect ratio?
Aspect ratio is the proportional relationship between an image or display’s width and height, expressed as two numbers separated by a colon (like 16:9). It defines the shape—not the actual size or pixels—of visuals. Examples: 1:1 (square), 16:9 (widescreen).
Mathematical Perspective:
The ratio stays constant regardless of size. A 16:9 image means for every 16 units wide, it’s 9 units tall—whether measuring inches, pixels, or centimeters. Doubling both numbers (32×18) keeps the same 16:9 ratio. It’s about proportions, not resolution.
Practical Applications:
Common ratios serve different purposes:
1:1 (Square): Used for Instagram/FB posts.
4:3 (Standard): Smartphones, older TV shows like Seinfeld.
16:9 (Widescreen): Modern HDTVs, streaming standards.
21:9 (Ultrawide): Gaming monitors.
Choosing the wrong ratio forces cropping (e.g., Netflix chops 4:3 shows to fit 16:9 screens).
Technical Nuance:
Your camera or screen dictates the ratio. DSLRs use 3:2; phones use 4:3. Changing ratios alters composition—a 2:3 portrait shot has 1.5x taller height than width. Remember: A 500x500px image and a 2500x2500px image both share a 1:1 ratio—size ≠ shape.
When someone refers to a 2:3 photo, they are indicating an aspect ratio of 2:3, such as 4 inches by 6 inches. Aspect ratios adhere to the mathematical principles of ratios, always expressed in their simplest form.
Why Photo Sizes Matter?
When photos adhere to standard sizes, it simplifies the process of sharing and distributing them, whether digitally or physically. Standard sizes are recognized globally, making it easier to send photos to clients, family, or friends.
For professional photographers, using standard sizes ensures that their work can be presented in a polished and professional manner. Clients expect standard sizes for ease of use and display.
Standard Photo Sizes help maintain consistency over time, which is important for historical records and archival purposes. This consistency aids in the preservation, cataloging, and retrieval of photographs in libraries, museums, and personal collections.
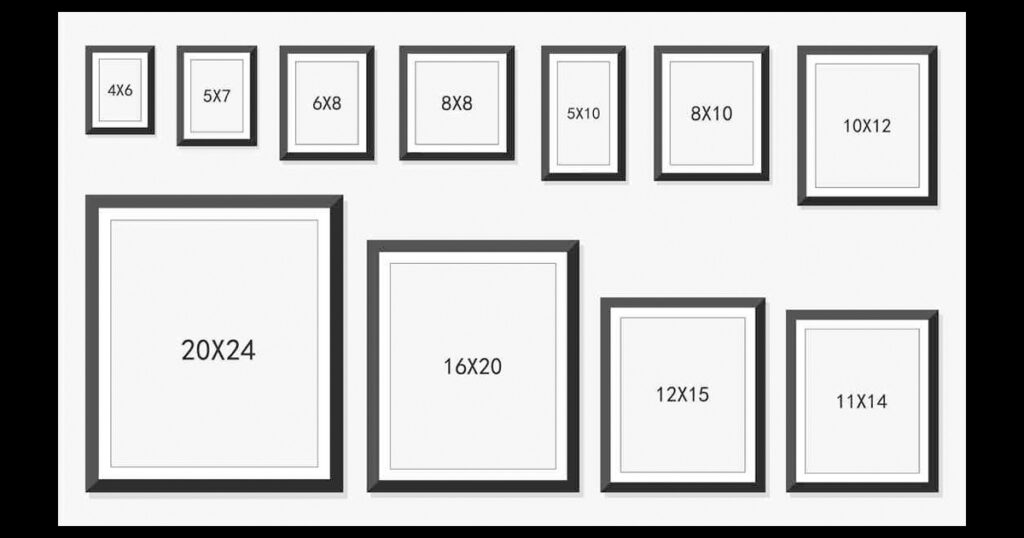
Different Standard Photo Sizes Explained
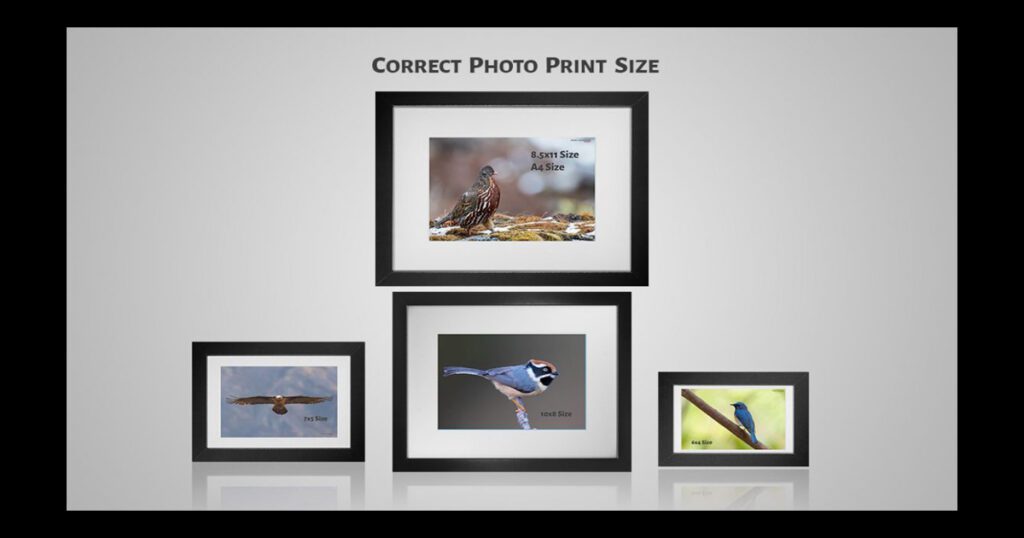
Here’s a breakdown of different standard photo print sizes like 4×6 inches, 5×7 inches, 8×10 inches, 8.5×11 inches, 11×14 inches, 12×18 inches, 16×20 inches, 18×24 inches, 24×36 inches, and square prints (8×8, 10×10, 12×12 inches), covering their uses, aspect ratios, resolutions, and cropping needs.
4×6 inches is the go-to, classic size. It perfectly matches a 3:2 aspect ratio (common on DSLRs), needing no crop for photos shot that way. Use it for albums, cards, and frames. Get sharp prints at 1200×1800 pixels.
5×7 inches offers a bit more detail, great for portraits or gifts. It usually requires a small crop. Aim for a 3.5:2.5 ratio if possible. You’ll need 1500×2100 pixels for top quality.
8×10 inches makes a bigger impact, popular for framing portraits. It uses a 5:4 aspect ratio. Cropping the long sides is often needed. Ensure your image is 2400×3000 pixels for best results.
Larger Sizes (11×14, 12×18, 16×20, 18×24, 24×36 inches) work well for posters, wall art, or focal points. Each demands very high resolution (e.g., 3600×5400 pixels for 12×18) and specific ratios (like 3:4 for 18×24) to avoid blurry prints. Cropping needs vary.
8.5×11 inches (A4 Paper Size) suits posters or bigger framed prints. A 4:3 ratio fits best. You can print a 12×8 (keeping 2:3 ratio) on it but must trim blank edges. Target 3400×4400 pixels.
Square Prints (e.g., 8×8, 10×10, 12×12 inches) are popular for Instagram shots, portraits, or art. They require cropping the image into a 1:1 ratio. Frames for these are readily available.
Why is choosing the correct image size important?
Choosing the correct image size is important because oversized images slow down your website, hurting user experience and SEO rankings. Undersized images look pixelated and unprofessional. Getting it right ensures fast speeds, clear visuals, keeps visitors engaged, and helps your site rank better.
Website Performance Perspective:
Getting the image size right is key for website speed. Oversized images make pages load slower. Slow loading frustrates users – over half leave if a mobile site takes more than 3 seconds. This speed bump also hurts your SEO because Google uses site speed as a ranking factor. Correctly sized images keep things zippy.
User Experience (UX) Perspective:
The right image size makes or breaks how users feel on your site. Undersized images appear blurry or pixelated, looking cheap. Oversized ones cause annoying layout shifts while loading. Fast-loading, clear pictures create a smooth, enjoyable visit that keeps people exploring instead of bouncing away.
Visual Quality & Professionalism Perspective:
Correct sizing ensures your images look sharp and professional. Too small? They get fuzzy. Too big crammed into a small space? They might look weird or distorted. Properly sized images fit well, look crisp, and make your whole site appear polished and trustworthy.
SEO & Business Impact Perspective:
Image size directly affects your search ranking and business success. Slow sites from big images rank lower on Google. Faster sites keep visitors longer, boosting your SEO chances. This means more people find you, leading to more inquiries and potential sales. Plus, correctly sized images display perfectly when shared on social media, attracting more clicks.
Standard Photo Sizes for Different Places
For Web
Remember that amazing photo collage you made for your family party? You printed it on big, shiny paper, and it looked stunning when you hung it up for everyone to see. But when you tried to share it on your website or blog, it appeared small and blurry, like a completely different picture!

An SEO expert would first suggest optimizing the Standard Photo Sizes for your website. Uploading large images can negatively impact your site’s performance by consuming valuable storage space and significantly slowing down load times. Slow website speed is one of the most common SEO mistakes.
A slow-loading website can initiate potential clients away and reduce traffic. Additionally, Google will down-rank your site, which can harm your business.

By uploading images that are perfectly sized for your website’s theme, you can ensure they display correctly in your CMS, lower your bounce rate, and improve your SEO ranking. Aim for common image sizes such as 1920×1080 pixels and 1080×1080 pixels for the best results.
For Printing
Photo print sizes are closely linked to common aspect ratios of photos, making them ideal for most photo albums and frames. Here are some of the most typical sizes available:
4×6 Inches
The 4×6 inch (10×15 cm) print size is probably the most standard, corresponding to the 2:3 aspect ratio commonly found in digital cameras and smartphones.

This size is perfect for fitting into most photo albums and matches the size of prints from 35 mm film, allowing for easy integration with older photos. For the best quality, aim for a resolution of 1200×1800 pixels. Squared.one offers 4×6 prints with either a matte or glossy finish, with options to add a thin frame or print the photo as is.
2×3 Inches
The 2×3 inch print maintains the same 2:3 aspect ratio and is ideal for wallet-sized photos, making it easy to carry pictures of loved ones or create mini photo albums. Squared.one offers this size for convenient personal use.

Passport Photos
Standard passport photos are 2×2 inches, while other common print sizes include 4×6 and 5×7 inches. Larger poster prints are often 8.5×11 inches.
5×7 Inches
A slightly larger typical print size is 5×7 inches (13×18 cm), suitable for photo albums, scrapbooks, and smaller frames for desks or shelves. For the best quality, aim for a resolution of 1500×2100 pixels. Note that the 5:7 aspect ratio is not standard in cameras or smartphones, so photos will need to be cropped. Squared. One’s easy photo editor allows you to adjust the crop to your preference.
4×4 Inches
Square photo prints, such as the 4×4 inch (10×10 cm) size, are also popular. Despite digital cameras and smartphones typically shooting in portrait or landscape mode, many photos can be cropped to a square format. For the best quality, aim for a resolution of 1200×1200 pixels.
18×24 Inches
For larger wall art, the 18×24 inch (45×60 cm) print size is a standard choice. Squared.one offers this size as wall art prints, with options to frame photos in wooden or aluminum frames, as well as canvas prints. For optimal quality, aim for a resolution of 5400×7200 pixels and a 3:4 aspect ratio.
On Social Media
Standard Photo Sizes on social media channels change frequently due to interface redesigns and updates to official dimensions at seemingly random intervals. Staying updated on the correct image sizes is crucial for successful social media campaigns, just like keeping up with the latest trends. Here’s why resizing your images correctly for social media should be a priority:

Pixelated or stretched images can appear unprofessional on your feed.
Incorrectly resized photos may be cut off, preventing your audience from seeing the full image.
Different social media feeds have unique requirements, so using the right size ensures your posts look great on each platform, avoiding pixelation issues.
For a quick and easy way to create beautiful social media posts, consider using high-quality stock photos. Here are the preferred image sizes for various platforms:
General Tips
File Formats: Upload images in JPG or PNG format to avoid compression. PNG is ideal for profile and cover photos.
Carousel Posts: Use images of at least 1080 x 1080 pixels for carousels with two to ten images.
360 Photos: Use JPG format and keep the file size under 30 MB.
Stories: pick an aspect ratio of 9:16, with images not smaller than 500 pixels. Leave 250 pixels at the top and bottom to account for profile photos and buttons.
Posts: Minimum resolution is 479 x 246 pixels for desktop links and 320 pixels width for mobile phones. Standard photo size is 1080 x 1350 pixels.
Right-Column Ads: Standard size is 1200 x 1200 pixels (aspect ratio 1:1), with a minimum resolution of 254 x 133 pixels.

Stories: Vertical orientation with a pixel dimension of 1080 x 1920 (aspect ratio 9:16). Rotate your photos or use a story template.
Posts: Maintain an aspect ratio of 1.91:1 to 4:5 and resize your photos between 320 and 1080 pixels. Lower resolution images will be enlarged to 320 pixels width, and higher resolution images will be downsized to 1080 pixels width.

Stories: Vertical orientation with a pixel dimension of 1080 x 1920 (aspect ratio 9:16). Rotate your photos or use a story template.
By following to these strategies, you can ensure your images are optimized for each platform, enhancing the professional look of your social media presence and maximizing audience engagement.
What Resolution Do You Need for Standard Photo Print Sizes?
For high-quality prints, standard photo print sizes like 4×6, 5×7, 8×10, and 11×14 inches need a resolution of 300 PPI (pixels per inch). This translates to specific pixel dimensions: 4×6 needs 1200×1800 pixels, 5×7 needs 1500×2100 pixels, 8×10 needs 2400×3000 pixels, and 11×14 needs 3300×4200 pixels. Larger sizes like 12×18 or 24×36 need even more pixels.
Viewing distance matters too. That crisp 300 PPI is perfect for photos you hold close. But for big posters or gallery walls viewed farther away? You can sometimes get away with lower resolutions, like 150 PPI. The farther back folks stand, the less extreme detail they can see.
Match the aspect ratio. Your photo’s shape (like 3:2 for 4×6 or 5:4 for 8×10) must fit the print size. If it doesn’t match, your image gets awkwardly cropped or stretched. Nobody wants their subject’s head cut off! Always check the ratio before hitting print.
Original photo quality is key. Starting with a super sharp, high-resolution image is the best bet. If your original photo is blurry or super small, cranking it up to 300 PPI won’t magically fix it. Garbage in, garbage out – a low-res pic printed big just looks pixelated and messy.
Resolution flexibility exists. While 300 PPI is the gold standard for top quality, decent smaller prints (like a 4×6) can sometimes use 200 DPI (800×1200 pixels). It’s a trade-off: slightly less super-fine detail for a smaller file size. But for anything you really care about, stick with 300.
What are the different sizes for square, large, and panoramic photo prints?
Square prints range from 4×4 to 30×30 inches (common: 5×5, 10×10, 12×12, 16×16, 20×20, 24×24). Large prints go from 10×13 to 30×40 inches (common: 11×14, 16×20, 20×24, 20×30). Panoramic prints span 5×10 to 24×60 inches (common: 5×15, 8×24, 12×36, 20×40).
Square Print Sizes:
These symmetrical prints fit social media crops or Polaroid-style displays. You’ll find sizes like 4×4 inches for small accents or big 20×20+ inches for bold walls. They’re perfect for portraits, nature shots, or city scenes. Remember the rule of thirds to avoid a stiff look if your subject is centered.
Large Print Sizes:
Big prints make a serious impact—think “wow factor” for your wall. Sizes like 16×20 or 20×30 inches turn photos into gallery pieces or statement posters. Use them for pro portraits, wedding groups, or stunning landscapes. Go big for high-definition quality that doesn’t quit.
Panoramic Print Sizes:
These wide shots wrap you in the scene, great for landscapes or big family photos. Sizes start slim at 5×10 inches and stretch to 20×40+ inches. Your shot prints as one uncropped image—no choppy segments. Pick sizes like 12×36 for sunsets or 20×40 for cityscapes.
What are the standard photo sizes for social media?
Standard sizes vary by platform and image type. Key sizes include: Facebook profile (320×320 min), cover (851×315 ideal), and posts (1080×1080 square); Instagram posts (1080×1080 square, 1080×1350 vertical); Twitter/X profile (400×400) and cover (1500×500); LinkedIn profile (400×400) and cover (1584×396); Pinterest pins (1000×1500); TikTok posts (1080×1920); YouTube banner (2560×1440 rec); Threads/Bluesky allow flexible post sizes.
Platform-specific variations matter significantly. Facebook uses different cover sizes for Profiles/Pages (851×315) versus Groups (1640×856) or Events (1920×1005). LinkedIn separates Personal profile covers (1584×396) from Company Pages (1128×191). Instagram supports multiple post ratios: square (1:1), vertical (4:5 or 3:4), and horizontal (1.91:1).
Content type dictates critical sizing rules. Profile pictures (e.g., 320×320 on FB/IG, 400×400 on Twitter/LinkedIn) always crop to circles. Cover photos often hide edges behind profiles (Facebook) or shift on mobile (YouTube). Stories/Reels (1080×1920, 9:16) need “safe zones” to avoid text cropping. Link preview images (usually ~1200×630) require Open Graph tags.
Aspect ratios are non-negotiable for proper display. Square posts (1:1) use 1080×1080 on most platforms. Vertical shots need 4:5 (1080×1350) for Instagram feeds or 9:16 (1080×1920) for Stories. Pinterest pins demand 2:3 (1000×1500), while YouTube banners stretch to 16:9 (2560×1440). Mismatched ratios cause awkward cropping or stretching.
Minimums and ideals serve different purposes. Minimums (e.g., Facebook cover width 720px) prevent rejection but risk pixelation. Ideal sizes (e.g., 1080×1080 posts) ensure crisp quality on HD screens. File size limits also apply: Twitter profiles cap at 2MB, Facebook links at 8MB.
Always verify platform docs—sizes change. Instagram now favors taller grid posts, Threads/Bluesky allow any post dimensions, and TikTok accepts 4:5 verticals. For sharp, professional visuals, stick to recommended specs and double-check updates!
What are the ideal photo sizes for web?
Ideal web photo sizes depend on placement. Use 2500 pixels wide for full-width images like hero banners. In-content images and blog posts work best at 1200-1600 pixels wide. Keep file sizes under 500KB (ideally ~200KB) for fast loading. Maintain correct aspect ratios like 16:9 or 1:1.
Full-Width Images (Hero/Banners):
These big background photos need high pixel counts. Aim for 1920 x 1080 pixels, 2500 pixels wide, or 2400 x 1600 pixels. This ensures they look sharp on huge monitors. Always use a 16:9 aspect ratio. Big screens demand big photos to avoid blurry or cropped messes.
In-Content Images & Blog Photos:
Standard website pictures and blog graphics should be smaller. Target 1200 x 630 pixels or 900 x 600 pixels. Limit their width to 1200-1600 pixels max. Match your blog’s content width exactly – say 800 pixels wide if that’s your layout. This stops ugly auto-resizing squishing your pics.
File Size & Speed:
Huge photo files are website speed demons. Crunch them down under 500KB, shooting for ~200KB. Anything over 2MB is a no-go. Slow loads wreck user experience and hurt your Google ranking bad. Tiny files mean zippy pages that keep visitors happy.
Aspect Ratios & Formats:
Keep your photos looking right by sticking to their shape. Use 16:9 or 3:2 for landscapes and 1:1 for squares. Squishing distorts them. For formats, WebP is top dog for shrinking files without killing quality, but check if all browsers play nice with it first.
Resolution & Retina Screens:
Standard web resolution is 72 PPI minimum. But fancy Retina displays need more juice. Consider 144 PPI or higher for those super-sharp screens. Good resolution means crisp details whether the photo is tiny or fills the whole screen.
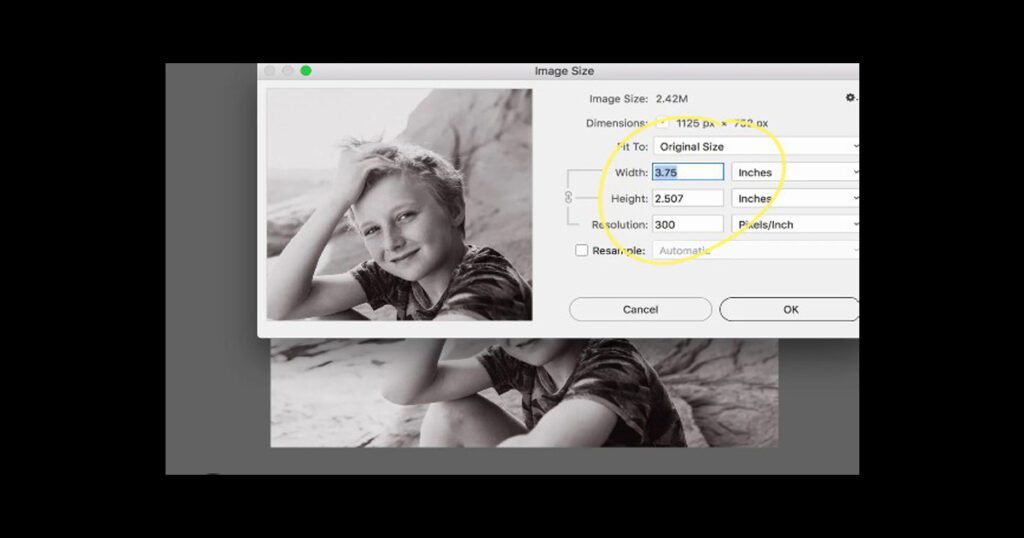
How to change an image size in Photoshop?
Here’s how to change an image size in Photoshop using the Image Size dialog box. Open your image, navigate to Image > Image Size, then directly adjust the Width, Height, Resolution, Resample setting, and unit of measurement (like pixels or inches).
Adjusting Dimensions & Units: Within the Image Size dialog, enter your desired numbers for Width and Height. Use the menus next to these fields to switch units (pixels, inches, cm, etc.). The Fit To menu offers handy preset sizes for common uses like web or print. Changing these values alters the image’s physical or pixel dimensions.
Setting Resolution: The Resolution field controls pixel density, crucial for print quality. Enter a new value here (e.g., 72 ppi for web, 300 ppi for print). Remember, changing resolution with Resample selected affects total pixels and file size; changing it without Resampling adjusts print size only.
Controlling Proportions: The chain link icon (Constrain Proportions) links width and height by default, preventing distortion. Click it to unlink if you must independently change width and height, altering the original aspect ratio (like making a square image rectangular).
Choosing Resampling: The Resample checkbox is key when adding or removing pixels. Check it when changing pixel dimensions (Width/Height) or Resolution if pixel count must change. Then, pick a Resampling Method from the dropdown: use Bicubic Sharper for size reduction (keeps details crisp) or Preserve Details for enlargement (use its Noise slider). Automatic lets Photoshop decide.
Saving Correctly: After clicking OK to resize, immediately use File > Save As to create a new file. This protects your original image. Saving over the original permanently changes it. The new file will reflect your chosen size settings.
Conclusion
Picking the correct photo size is a big deal. Standard photo print sizes like 4×6 inches, 5×7 inches, and 8×10 inches are popular for albums and frames. Passport photos demand that exact 2.5×2 inches size. Aspect ratios like 3:2 or 4:5 define the shape – mismatch them, and you lose parts of your picture to cropping. Printing a DSLR’s 3:2 image on 8×10 inch (4:5) paper? That chops off edges.
Getting the resolution right is just as important. Aim for 300 PPI for sharp standard prints. That means 1200×1800 pixels for a crisp 4×6 inch print. Bigger posters viewed from farther away? You can sometimes use 150 PPI. Start with a high-quality original image for the best results.
Online needs are different. Social media platforms have strict rules: think 1080×1080 pixels for Instagram square posts or 1080×1920 pixels for TikTok videos. Website images need balance. Full-width banners often require 2500 pixels wide, while regular blog pics work best around 1200-1600 pixels wide. Keep file sizes small (under 500KB!) for fast loading. Slow websites frustrate visitors and hurt your search ranking. The right size makes or breaks your site’s look and speed.
Tools like Photoshop make resizing straightforward. Use the Image Size dialog (Image > Image Size). Change the width, height, or resolution. Always check “Constrain Proportions” to avoid a squished look. Pick the right resampling method – “Bicubic Sharper” for shrinking works great. Save your resized image as a new file to protect the original.
Ready to make your photos shine everywhere? Grab your best shots, check their size and shape, and resize them perfectly – for your wall, your feed, or your website. Get the size right, and your pictures will always look their absolute best.