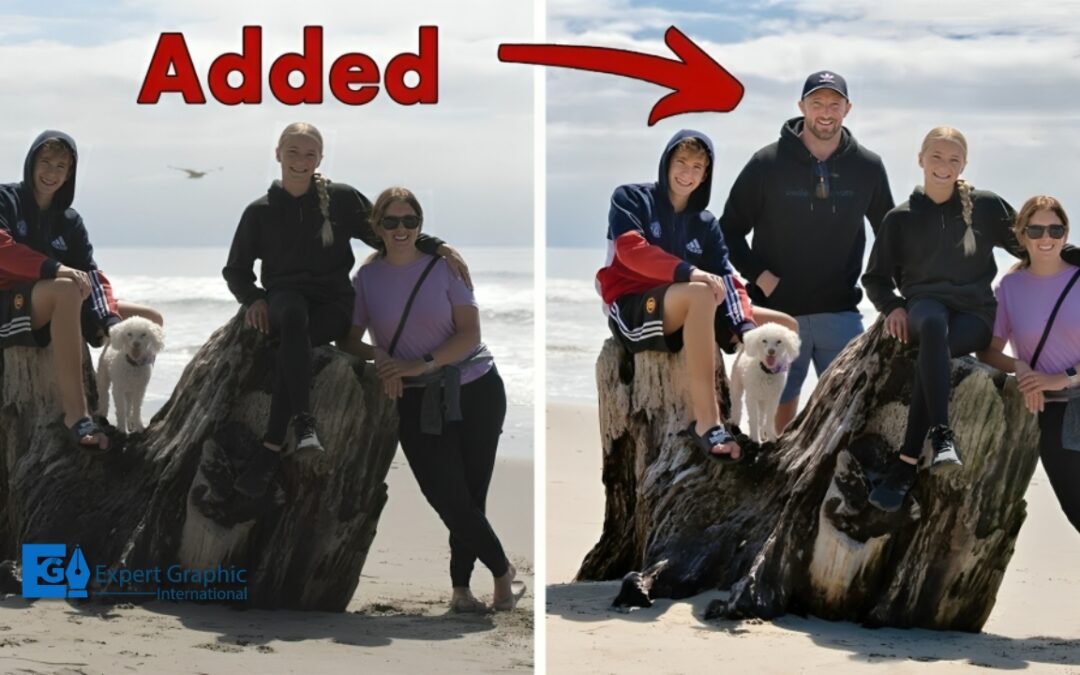
Ever wanted to add someone to a photo, but they weren’t there when you took it? Whether you want to create a fun memory or fix a missing group member, knowing how to edit a person into a photo seamlessly is a handy skill. In this guide, we’ll break down everything step by step!
Why You Might Want to Add a Person to a Photo
There are plenty of reasons why people edit someone into a picture:
- Fixing a missed group shot.
- Creating fun, artistic edits.
- Professional work, like marketing images.
- Restoring an old memory.
No matter the reason, the key is making it look natural!
Essential Tools for Editing a Person into a Photo
Photo Editing Software
- Adobe Photoshop – The industry standard.
- GIMP – A free alternative.
- Canva & Pixlr – User-friendly web tools.
Mobile Apps for Quick Edits
- PicsArt
- Snapseed
- Adobe Photoshop Express
Preparing the Images
Choosing the Right Photos
- Ensure both images have similar lighting and resolution.
- The person’s position should fit naturally into the new background.
Ensuring Matching Lighting and Perspective
- A person added to a photo should align with existing shadows.
- Perspective matters! They shouldn’t look out of place.
Extracting the Person from Another Photo
Using Selection Tools
- Pen Tool (Best for clean edges)
- Magic Wand (Quick but needs refining)
- Lasso Tool (For freehand selection)
Refining the Edges
- Feather the edges slightly to blend seamlessly.
- Use “Select and Mask” in Photoshop for better results.
Placing the Person into the New Photo
Positioning and Resizing
- Adjust the size proportionally to match the new scene.
- Ensure correct alignment with other objects.
Adjusting the Perspective
- Use Transform Tool to tweak angles.
- Match eye level with the rest of the image.
Blending the Added Person Seamlessly
Matching Colors and Shadows
- Adjust brightness, contrast, and color tone.
- Use the “Match Color” feature in Photoshop.
Using Adjustment Layers
- Add Curves, Hue/Saturation, and Brightness/Contrast layers.
- Make fine adjustments to match the person to the environment.
Fine-Tuning and Enhancing Realism
Adding Shadows and Highlights
- Shadows make the edit realistic.
- Use the Burn Tool or create shadows manually with a soft brush.
Correcting Noise and Sharpness
- Apply Blur or Sharpen filters where necessary.
- Match the noise/grain level with the original photo.
Using AI Tools for Automatic Edits
- Remove.bg for automatic background removal.
- Fotor and Canva AI for easy blending.
Final Touches and Saving the Edited Image
- Save in high resolution for quality output.
- Use PNG for a transparent background or JPEG for final sharing.
Common Mistakes to Avoid
- Mismatched lighting – It makes the edit obvious.
- Incorrect perspective – The person must fit naturally.
- Ignoring shadows – Without them, the person looks out of place.
Alternative Ways to Edit a Person into a Photo Without Photoshop
- Use mobile apps like PicsArt or Snapseed.
- Online tools like Remove.bg + Canva.
Legal and Ethical Considerations
- Avoid using someone’s photo without permission.
- Be mindful of misleading edits.
Adding a person to a photo isn’t just about cutting and pasting—it’s an art! With the right tools and techniques, you can create stunning, natural-looking edits. Whether for fun or professional use, mastering these skills can take your photo editing game to the next level!
Frequently Asked Questions
1. What is the easiest way to edit a person into a photo?
Using AI tools like Remove.bg combined with Canva or PicsArt is the easiest way.
2. Can I do this on my phone?
Yes! Apps like PicsArt and Photoshop Express allow you to edit on mobile.
3. How do I match the lighting in an edited photo?
Use adjustment layers to tweak brightness, contrast, and color temperature.
4. What’s the best free tool for editing someone into a photo?
GIMP and Remove.bg offer great free editing options.
5. How can I make my edits look professional?
Pay attention to shadows, perspective, and color blending for a seamless look.