Have you ever stood under a night sky, jaw dropped, as green and purple light curtains danced above you? The Northern Lights, or aurora borealis, are one of nature’s most jaw-dropping spectacles. Capturing that beauty on your iPhone feels like bottling up magic—but raw images don’t always do them justice. That’s where editing comes in.
Whether you’re using an iPhone 13 or the latest iPhone 15 Pro, you can turn a good shot into a stunning one with a few simple tweaks. So, let’s dive into how to edit Northern Lights photos on an iPhone like a pro.
Getting the Right Shot First
Before you even think about editing, you need a solid base image.
Shooting RAW on iPhone
If your iPhone supports ProRAW (iPhone 12 Pro and up), use it! RAW images give you more data to play with, allowing you to edit without losing quality.
Using Night Mode or Third-Party Apps
Turn on Night Mode—it extends the shutter time to let in more light. For manual controls, try apps like Halide or ProCamera. These let you tweak ISO, shutter speed, and white balance.
Essential Camera Settings to Capture Auroras

- ISO: Keep it as low as possible (try ISO 400–800) to reduce grain.
- Shutter Speed: 10-15 seconds usually does the trick.
- Focus: Manually set to infinity if possible.
Best Apps to Edit Northern Lights on iPhone
iPhone’s built-in editor is solid, but third-party apps bring your photos to life.
Apple Photos App
Simple, intuitive, and built-in. Start here if you’re a beginner.
Lightroom Mobile
It offers powerful tools for fine-tuning Aurora images, such as selective edits, gradient masks, and RAW editing.
Snapseed
Google’s Gem. It’s free and packed with features like curve adjustments and selective editing.
VSCO & Afterlight
Perfect for those who like to add creative filters while keeping a natural look.
Step-by-Step Guide: How to Edit Northern Lights Photos on iPhone
Now, let’s start editing.
Step 1: Start with Exposure
Northern Lights are often dim, so increase exposure slightly. But don’t go overboard—keep the stars visible.
Step 2: Adjust Highlights and Shadows
Bring down highlights to recover details in the aurora. Lift shadows just a bit to reveal foreground elements.
Step 3: Enhance Colors Without Oversaturating
This part’s fun. Increase vibrance more than saturation to avoid cartoonish hues. Focus on greens, purples, and blues.
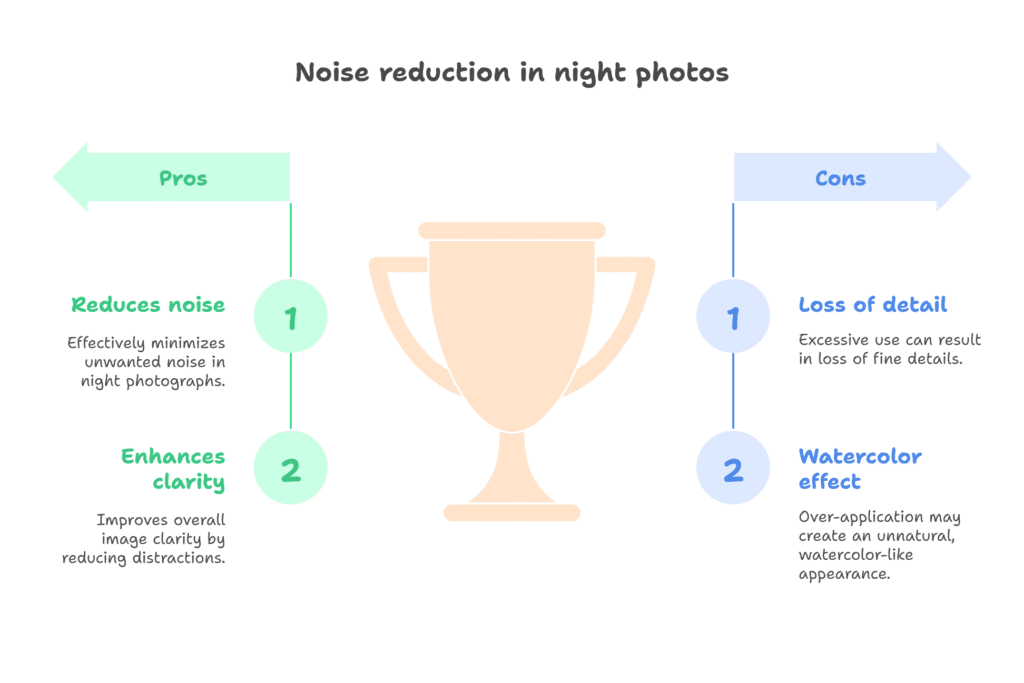
Step 4: Use Noise Reduction Carefully
Night shots = noise. Use the noise reduction tool, but keep the detail intact. Too much, and it’ll look like a watercolor painting.
Step 5: Sharpen the Details
Boost clarity and texture slightly to make the aurora pop. But again—moderation is key.
Advanced Tips for Editing Northern Lights
Want to level up your editing game?
Use Gradient Filters for Depth
Darken the sky gradually or add light to the foreground with gradient filters in Lightroom or Snapseed.
Split Toning for Artistic Effects
Add cool tones to shadows and warm tones to highlights for a cinematic vibe.
Play with Temperature and Tint
Cooler temperatures enhance the natural glow. To balance the colors just right, tweak the tint toward green or magenta.
What to Avoid When Editing Northern Lights Photos
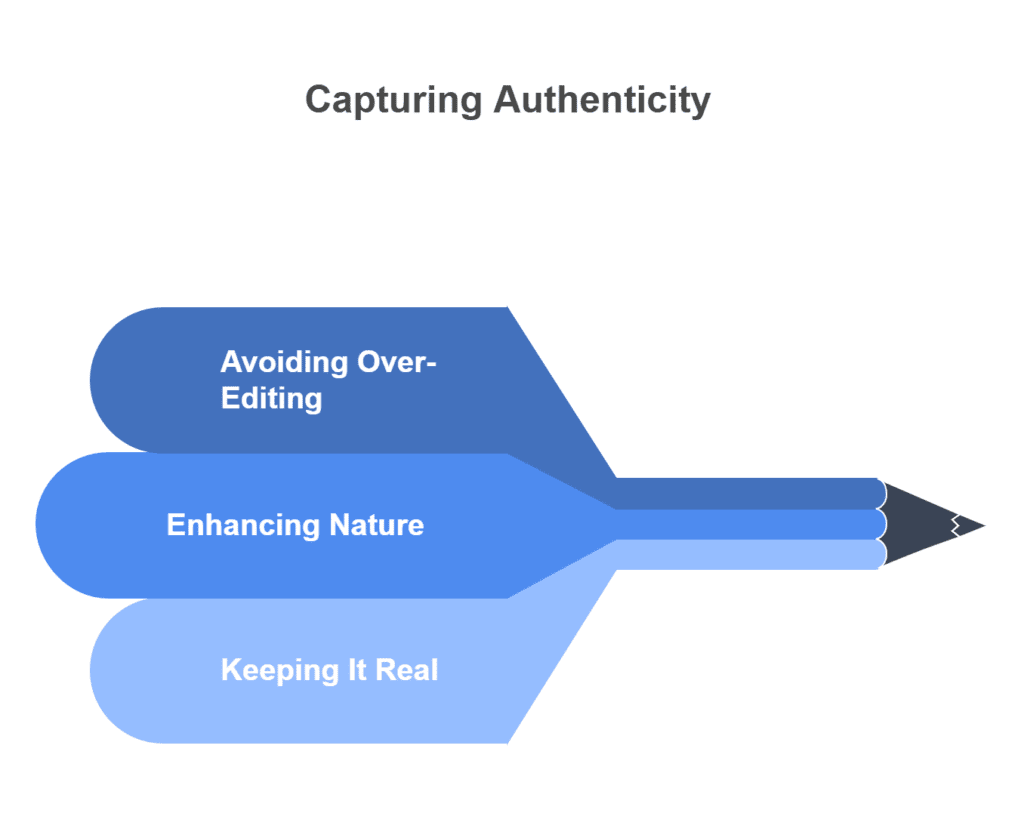
Over-editing That Destroys Natural Beauty
You’re enhancing nature—not painting over it. Keep it real.
Excessive Noise Removal
Noise is natural in night photography. Removing too much makes the photo blurry.
Fake Colors vs Realistic Enhancement
Bright pink auroras? Probably not real. Keep colors accurate to what you saw.
Saving and Exporting for Best Quality
Export Settings in Different Apps
- Lightroom: Export as JPEG or TIFF for print.
- Snapseed: Save a copy to preserve the original.
Tips for Social Media vs Printing
- Social Media: Resize and compress lightly.
- Printing: Keep full resolution and use TIFF or high-quality JPEG.
Before and After Examples (Explanation Only)
Let’s imagine this: your original photo is dark with barely-there lights. After editing, the sky glows with green waves, the stars are sharper, and the foreground has depth. Editing transforms “meh” into “wow.”
Why the iPhone is Great for Northern Lights Photography
Modern iPhones have powerful sensors, Night Mode, and RAW capture. Add editing apps, and you have a full photo studio in your pocket. With the correct settings and techniques, even an iPhone can do justice to the aurora borealis.
Capturing the Northern Lights on your iPhone is an experience you’ll never forget. But don’t let underwhelming photos dull the memory. With the right apps and techniques, you can edit Northern Lights photos on your iPhone and turn them into visual masterpieces. So next time you’re under that dancing sky, shoot with confidence—and edit with creativity.
Frequently Asked Questions
1. Can I capture the Northern Lights with just an iPhone?
Yes! Modern iPhones, especially Pro models, have powerful cameras and Night Mode that work surprisingly well for aurora photography.
2. What iPhone model is best for Northern Lights?
The iPhone 13 Pro and above are ideal due to their ProRAW capability and superior low-light performance.
3. Is Lightroom mobile free for editing Aurora photos?
Yes, it’s free to use. Some premium features require a subscription, but basic editing is more than enough.
4. How can I reduce grain without losing detail?
Use a mix of noise reduction and clarity. Lightroom’s Detail tab lets you fine-tune this balance.
5. Do I need to use a tripod for iPhone Aurora shots?
Absolutely. A tripod keeps your iPhone stable during long exposures, ensuring sharp, vibrant shots.