Portrait shadows can add drama to a photo, but often the shadow within your picture may just not work with your image. Shadows on the face can be distracting and unflattering or can be concealing details, especially in portrait photography. But the good news is that there are various effective tools and techniques that Photoshop will introduce to you along your path to remove or reduce the presence of shadows and yielding a clear, clean look.
In this guide, we explain how to remove shadows from faces in Photoshop, including these methods:
- Using the Clone Stamp Tool
- Using the Healing Brush and Spot Healing Tools
- Dodge and Burn Tool for Shadow Adjustment
- Layers and Masking
- Advanced Techniques (frequency separation & Content-Aware Fill)
How to Remove Shadow from Face in Photoshop
So let’s jump right into the step-by-step methods to remove shadows from faces in Photoshop.
1. Using the Clone Stamp Tool
The Clone Stamp Tool is a tried and tested method to remove any unwanted object in an image including the shadows.
How to Use the Clone Stamp Tool: Step-By-Step
- Select the Clone Stamp Tool: Select from the toolbar or press S on your keyboard.
- Sample Area: Hold the Alt key (Option key on Mac) and click an area of skin next to the shadow that is the same color of skin you want it to be.
- Brush over the Shadow: Use a soft brush to paint over the shadowed region taking care of texture and tone.
- Brush Hardness and Opacity: We reduce the brush opacity so that it blends shadow more with the area around, this is necessary for a realistic look.
Clone Stamp Tool is a great tool, but you would have to blend it perfectly, and it might work for only small shadow areas. Pair this with other tools, such as the Healing Brush, for larger shadows.
2. Healing Brush and Spot Healing Brush
Our first task for shadows on faces in Photoshop is to use the Healing Brush (J) and Spot Healing Brush (J) to remove imperfections on the skin and have textures blend seamlessly.
How to Use the Healing Brush Tool
- Select the Healing Brush Tool: The Healing Brush Tool looks like a Barbie doctor (located in the toolbar or accessible with the key J on your keyboard).
- Select a Sample: Work just as you would with the Clone Stamp Tool, using the Alt key (Option key on Mac) to sample a patch of clear skin.
- Paint over Shadow: Over the area where the shadow is When you paint with the Healing Brush Tool, the texture of the sampled area is used to replace the corresponding area of the destination while automatically blending the sampled area’s color with the destination.
Spot Healing for Small Areas — The Spot Healing Brush is great for small, persistent shadows or spots. It does not need a sample point and automatically matches tones around the area.
Tip: When using the brush, change the size according to the shadowed area. A softer blending can be achieved using multiple passes of low opacity.
3. Using the Dodge and Burn Tools
The Dodge Tool is the underlying principle behind lightening particular parts of an image the Burn Tool is used to darken them. They are useful to lighten darkened areas on the face, without losing detail.
How to Use Dodge Tool:
- Go to toolbar → Select Dodge Tool (O)
- Set the range to Midtones and the Exposure to a low setting (eg: 10-20%) to avoid harsh changes.
- Lighten the Shadows: With a soft brush, paint over the shadowed areas gradually, building up passes until the shadow blends with the surrounding skin tone.
Equal: Use the Dodge Tool with care not to overexpose the region that appears unnatural.
4. Utilizing Layers and Masking
For more precise adjustments and non-destructive changes, layers and masking are essential. It also provides a way to subtle shadow spots while keeping the source image intact.
Follow these Steps of Usage Layers and Masking
- Duplicate the Background Layer: Right-click on the background layer and select Duplicate Layer. This keeps the original safe.
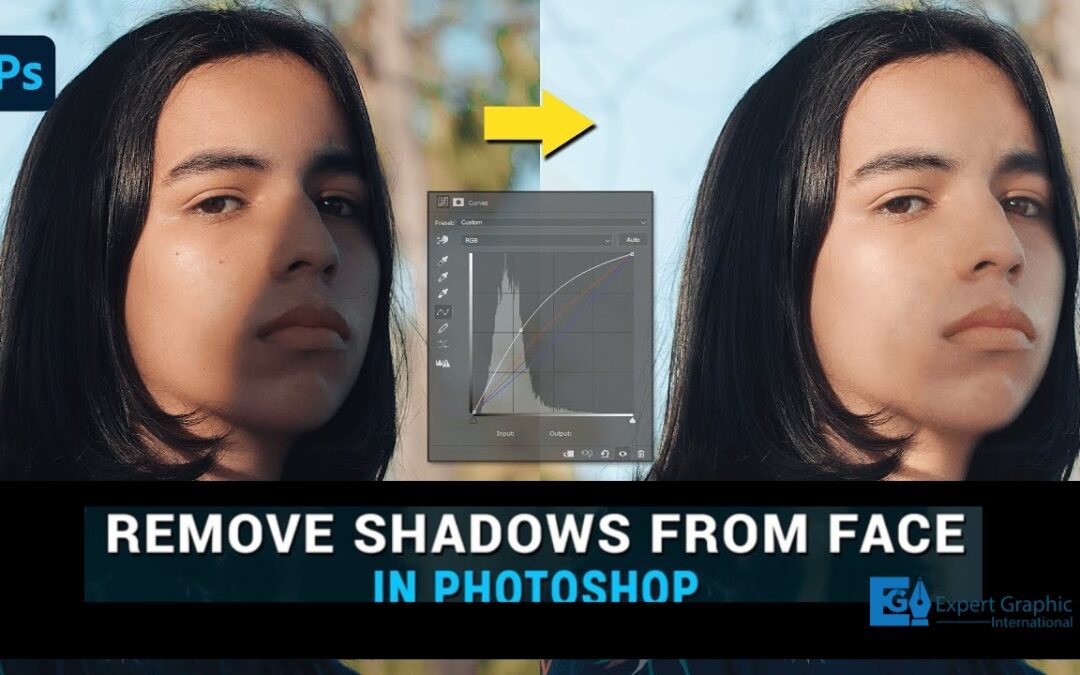
- Tip 4: Using Adjustment Layers — Add a Curves or Levels adjustment layer to lighten or darken parts. Drag the curve on the curve tab to illuminate the shadowed side of the face.
- Add Layer Mask: Click to add a mask on the adjustment layer. CTRL+I to hide the adjustment from the mask.
- Brush in the Adjustment: With a soft white brush on the mask, paint over the areas in shadow. Hence here, only the shadowed parts will be revealed, due to the lightening effect.
Pro Tip: Reduce the Opacity of the brush to blend in a more precise and subtle manner.
5. Pro Method: Frequency Separation
Frequency Separation is a way to separate the texture of the image from the color part of the image so you can have one layer represent the texture and one layer be the colors so you can work on them independently from each other. This is very useful for portraits since it gives you very precise control of shadows and skin texture.
How to do Frequency Separation:
- Step 1 to prepare Frequency Separation: Duplicate Image Twice Annotate the first one with Texture and the one beneath with Color.
- Gaussian Blur the Color: Click on the Color layer and then select Filter > Blur > Gaussian Blur and blend it out until it fades into the background but the details are still visible.
- Hit Image on Texture layer: Select the Texture layer, Image > Apply Image, Channel Color, Blending mode Subtract, Adjust to isolate the details.
- Change the Texture Layer to Linear Light: This restores the original appearance.
- Edit the Layers Individually — you can now edit and use the Healing Brush on the Texture layer, & soft brushes on the Color layer to patch up shadows without affecting the skin texture. It takes some getting used to, but the results can be quite realistic.
6. Content-Aware Fill
For erasing large shadows, Photoshop’s Content-Aware Fill is extremely effective, especially for shadows that fall across considerable areas of the background or do not fall across features of the face.
How to Use Content-Aware Fill:
- Step 1: Use the Lasso tool to draw round the selected area
- Step 2: Select the shadow
- Step 3: Fill in the selected area using Content-Aware. Edit→ Content-Aware Fill Photoshop will look at surrounding regions and try to fill the choice with a patch.
Adjusting the Sampling Area: In the Content-Aware workspace, extend the sampling area to ensure we have a closer color match for the skin. Accept the Change: Click OK, and that fill is applied, therefore taking the shadow away.
Other Tips for Making Edits Look Natural
- Zoom In Zoom Out — Check yourself by zooming in and out to compare it against the original image and make sure you have achieved a realistic result.
- Use Weighted Brushes: Weighted brushes help to smooth the adjustments.
- Step Away: Taking a break and then re-reading your code can reveal problems that you did not catch while writing it.
- Use this in conjunction with others: Never depend entirely on a single approach. Depending on what sounds most natural, you can mix and match these approaches.
Conclusion
Not all face shadow removal techniques are pain-free and done in one click, this is an essential skill for anyone who works with portraits including photographers and editors. With practice in these techniques, you can produce clean images while keeping the subject looking intact. With everything from fast edits using the Healing Brush, to nuanced edits using Frequency Separation, Photoshop has everything you need to tackle shadows. Try out these methods and see what works well for your particular image. With practice, you will learn to automatically eliminate the non-desired shadows from your photos and make them look neat and professional.