
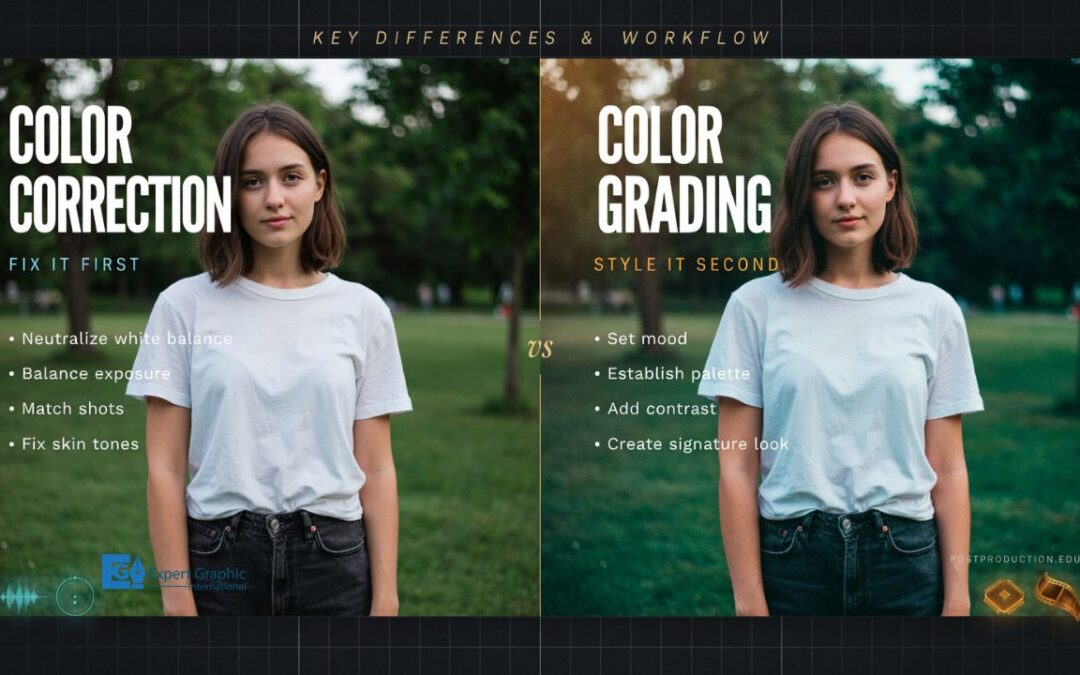
Every great video starts with clean footage and ends with a mood that sticks. Color correction fixes the technical stuff first: exposure, white balance, and contrast, so your footage looks natural instead of off. You correct color by working through a set order, white balance, then exposure, then contrast, then saturation, and checking scopes along the way instead of just trusting your eyes.
Once your footage looks clean, color grading takes over. Grading is the creative side of things: it pushes tones and style onto your corrected footage to create a mood, like warming up a flashback or cooling down a tense scene. You build a grade by starting with a LUT or reference look, then fine-tuning with color wheels and curves to nail the vibe you’re going for.
So what actually separates the two? Correction is objective and technical, it fixes what’s broken. Grading is subjective and creative, it adds personality. They also lean on different tools: correction uses scopes like waveforms and vectorscopes, while grading leans on LUTs and wheels. And here’s the golden rule: correction always comes first. Skip it, and your grade turns muddy fast.
Put it all together and you get a five-stage workflow: set up your color space, correct each clip, match your shots, apply the creative grade, then double-check your scopes before export. LUTs help speed this whole process up, technical LUTs convert flat log footage into something usable, while creative LUTs slap a style on top. That log footage, by the way, looks washed out on purpose. It’s built to hold onto detail until you convert it to Rec. 709, the standard format screens actually display correctly.
Both DaVinci Resolve and Premiere Pro handle this workflow well, just with different tools. Resolve uses a node-based system where each adjustment gets its own building block. Premiere keeps it simpler with the Lumetri Color panel, Basic Correction first, Creative tab second.
What Is Color Correction in Video?
Color correction is the technical process of fixing exposure, white balance, contrast, and color casts so footage looks natural and consistent across every clip. It happens first in post-production, establishing a neutral, accurate baseline before any creative styling begins.
Raw footage rarely looks right straight out of the camera. Mixed lighting sources create color casts, exposure shifts between shots, and skin tones can skew orange or green depending on the light source. Color correction removes these inconsistencies so the footage matches reality, and so every clip in a sequence looks like it belongs together.
The process is objective, not artistic. Colorists match footage to the human eye’s expectations: whites appear white, blacks appear black, and skin tones read as natural. This technical foundation is given below:
- White balance correction: fixes color temperature so whites and skin tones look accurate under mixed or artificial lighting.
- Exposure adjustment: balances the amount of light captured so highlights and shadows retain visible detail.
- Contrast correction: sets the tonal range between light and dark areas to add depth without crushing blacks or blowing out whites.
- Color balance and saturation: neutralizes unwanted tints and levels out color intensity across the frame.
- Shot matching: aligns multiple clips from different cameras or lighting setups so a sequence cuts together seamlessly.
How to Correct Video Color?
To correct video color by adjusting white balance first, then exposure, then contrast, and finally saturation, using scopes to verify each step instead of relying only on your eyes. This order prevents overcorrection and keeps every later adjustment built on an accurate base.
Start with white balance. Use the temperature and tint sliders, or an eyedropper tool on a neutral white or gray object in the frame, to remove unwanted orange or blue color casts. This step alone fixes the majority of unnatural-looking footage.
Move to exposure next. Reference a waveform scope to confirm your highlights and shadows sit within a usable range, since overexposed footage blows out detail and underexposed footage introduces visible noise when brightened later. Adjust contrast after exposure to add depth, watching for clipped whites or crushed blacks in the scope. Finish with saturation and secondary adjustments to fine-tune specific color ranges. The core correction steps are given below:
- Set white balance using temperature and tint sliders or a white-balance eyedropper on a neutral object in the frame.
- Balance exposure with a waveform scope to keep highlights and shadows within a visible, recoverable range.
- Adjust contrast to add tonal depth without clipping whites or crushing blacks.
- Fine-tune saturation to normalize color intensity across the clip before any creative grading begins.
- Match shots across a sequence so clips from different cameras or lighting conditions cut together consistently.
What Is Color Grading in Video?
Color grading is the creative process of applying tones, styles, and moods to corrected footage to evoke emotion or build a specific visual identity. It happens after color correction and uses tools like LUTs, color wheels, and curves to push footage toward a stylized, intentional look.
Where color correction fixes problems, color grading builds a feeling. A director might warm a flashback scene to feel nostalgic or desaturate a suspenseful scene to feel cold and isolating. This stylistic layer turns technically accurate footage into footage with personality and narrative purpose.
Color grading also builds brand consistency across a body of work. A creator who applies the same LUT and tonal adjustments across every video in a series produces a recognizable visual identity that viewers associate with that channel or brand, reinforcing recall every time a new video appears.
How to Create a Creative Color Grade?
To create a creative color grade by starting with a LUT or reference look, then refining color wheels and curves to push specific hues, contrast, and mood toward your intended style. The grade only works correctly once color correction is complete, since grading tools amplify whatever inconsistencies remain in the base footage.
Begin by selecting a Look or LUT as a starting point rather than a final result. Apply it at low opacity first, then adjust intensity until the effect supports the footage instead of overwhelming it. From there, use color wheels to shift shadows, midtones, and highlights independently, pushing warm tones into highlights or cool tones into shadows for a classic cinematic contrast.
Curves offer more precise control than wheels for fine adjustments to specific tonal ranges or individual color channels. Secondary color adjustments let you isolate one color, like skin tone or sky, and shift it without affecting the rest of the frame. The creative grading steps are given below:
- Apply a LUT or Look as a starting reference, then adjust its opacity so the effect enhances rather than dominates the footage.
- Push color wheels to shift shadows, midtones, and highlights toward complementary tones for cinematic contrast.
- Refine with curves to control specific tonal ranges and individual RGB channels with more precision than wheels allow.
- Isolate colors with secondaries to adjust one hue, like skin tone or foliage, independently from the rest of the frame.
- Save the look as a preset to apply the same grade consistently across multiple clips or an entire video series.
What Is the Difference Between Color Correction and Color Grading?
Color correction is a technical, objective process that fixes exposure and color accuracy, while color grading is a creative, subjective process that applies mood and style. Correction makes footage look real; grading makes footage look intentional.
The two processes serve opposite goals despite happening in the same software. Correction aims for neutrality matching what the human eye expects from real-world lighting and skin tones. Grading aims for personality pushing the image toward a specific emotional or stylistic target that may look nothing like reality.
How Is Color Correction Different From Color Grading?
Color correction addresses technical flaws like white balance, exposure, and contrast, while color grading addresses creative choices like tone, mood, and stylistic color palettes. The two also differ in sequence, purpose, and the tools each one leans on most heavily.
Correction relies on scopes and objective reference points: a waveform for brightness, a vectorscope for hue accuracy, and neutral white or gray objects in frame. Grading relies on subjective judgment, reference images, and LUTs, since there’s no single correct answer to how warm or cool a scene should feel. The key distinctions are given below:
- Purpose: correction restores technical accuracy; grading builds emotional tone and visual identity.
- Sequence: correction happens first to establish a clean baseline; grading happens second on top of that baseline.
- Tools: correction uses waveform and vectorscope readings; grading uses LUTs, color wheels, and curves.
- Judgment type: correction follows objective, measurable targets; grading follows subjective, creative intent.
- Reversibility: skipping correction makes grading unpredictable, since creative tools amplify existing flaws instead of fixing them.
Which Comes First, Color Correction or Color Grading?
Color correction always comes first, establishing an accurate, balanced image before any creative color grading begins. Applying a creative LUT to uncorrected footage produces muddy, unpredictable results because the grading tool amplifies existing exposure and white balance problems instead of a clean image.
This sequence matters because grading tools like LUTs and color wheels are built to enhance an already-neutral image. Skipping correction and grading directly from raw or log footage often produces a shot that looks washed out, overly green, or inconsistent with the rest of the sequence, forcing the colorist to redo the work from scratch.
What Is the Video Color Workflow?
The video color workflow moves through five stages: color space setup, primary correction, shot matching, creative grading, and final scope checks before export. Skipping or reordering these stages is the most common reason a color grade looks inconsistent or unnatural.
The process starts before any sliders move. Setting the correct color space and color management in your software ensures log or flat footage is interpreted correctly rather than displayed with washed-out contrast. From there, primary correction establishes accuracy, shot matching keeps a sequence visually consistent, and grading applies the final creative layer. The five workflow stages are given below:
- Configure color space: set the project’s color management and confirm log footage will convert correctly to Rec. 709 for viewing.
- Apply primary correction: fix white balance, exposure, and contrast on each clip to establish a neutral, accurate base.
- Match shots across the sequence: align tone and color between clips from different cameras or lighting conditions.
- Apply the creative grade: use LUTs, color wheels, and curves to build the intended mood and stylistic identity.
- Check scopes before export: confirm the final image stays within broadcast-safe or platform-safe levels using the waveform and vectorscope.
How Do LUTs Help With Color Correction and Grading?
A LUT or Look-Up Table is a preset file that maps existing colors to new ones, and it serves two roles: technical LUTs convert log footage into a normal color space, while creative LUTs apply a stylized look. LUTs speed up both correction and grading by replacing manual, clip-by-clip adjustments with a single applied file.
Technical LUTs, often labeled as Rec. 709 conversion LUTs, transform flat, low-contrast log footage into a standard viewing image so colorists can judge exposure and color accurately. Applying a technical LUT is a correction step, not a creative one, since it simply reveals the colors the camera has already captured. Creative LUTs come after that conversion, layering a stylistic look like film emulation or a cinematic color palette on top of the corrected image. Applying a creative LUT directly to log footage, before conversion, produces a muddy or overly saturated result because the LUT expects a normal-range input.
What Are Log Footage and Rec. 709?
Log footage is a flat, desaturated recording format that compresses highlights and preserves maximum dynamic range for later grading, while Rec. 709 is the standard color space used for HD delivery on TVs, monitors, and streaming platforms. Editors convert log footage to Rec. 709, typically with a LUT, before final color grading and export.
Cameras that shoot in log profiles Sony’s S-Log, Canon’s C-Log, Panasonic’s V-Log, and similar formats deliberately record a washed-out, low-contrast image because that flatness preserves shadow and highlights detail that a standard image discards. This extra data gives colorists more room to push exposure and color without visible banding or clipping. Rec. 709 is the opposite: a finished, display-ready color space that nearly every screen is calibrated to show correctly, making it the standard delivery format for broadcast and web video.
How Do You Color Correct and Grade Video in DaVinci Resolve?
DaVinci Resolve uses a node-based Color page where each node represents one isolated adjustment, letting colorists build a chain from basic correction through creative grading without adjustments interfering with each other. Correct first inside early nodes, then grade using later nodes in the same chain.
The Color page separates work into individual nodes connected in a tree. A typical structure starts with a balance node for white balance and exposure, followed by a contrast node, a color node for saturation and hue, a secondary node for isolated adjustments like skin tone, and a final look node for the creative grade or LUT. Keeping each adjustment in its own node means any single step can be toggled off or refined without disturbing the rest of the chain. The DaVinci Resolve workflow steps are given below:
- Configure color management: set the color science and confirm log footage will convert to Rec. 709 correctly in Project Settings.
- Build a balance node: correct white balance and exposure first using the color wheels and waveform scope.
- Add a contrast node: refine the tonal range separately from white balance to keep each adjustment isolated and reversible.
- Add a color node: adjust saturation and overall hue once the image is technically balanced.
- Use secondaries for isolation: apply qualifiers or power windows to adjust a specific color, like skin tone, independently.
- Finish with a look node: apply a LUT or creative color wheel pushes as the final stylistic layer on top of the corrected chain.
How Do You Color Correct and Grade Video in Premiere Pro?
Premiere Pro handles both processes inside the Lumetri Color panel: the Basic Correction tab fixes white balance, exposure, and contrast, while the Creative tab applies LUTs, Looks, and stylistic adjustments afterward. Scopes in the Lumetri Scopes panel confirm each step stays within an accurate, exportable range.
Open the Color workspace and the Lumetri Color panel appears alongside your footage and scopes. In Basic Correction, use the temperature and tint sliders or the white-balance eyedropper to fix color casts, then adjust exposure, contrast, highlights, shadows, whites, and blacks to build a balanced tonal range. Only after this base is accurate should you move to the Creative tab to apply a LUT or Look. The Premiere Pro workflow steps are given below:
- Open the Color workspace: access the Lumetri Color and Lumetri Scopes panels together for a proper reference view.
- Fix white balance first: use the Temperature and Tint sliders or the eyedropper tool to neutralize color casts.
- Balance tone next: adjust Exposure, Contrast, Highlights, Shadows, Whites, and Blacks using the waveform scope as a reference.
- Apply the Creative tab: add a LUT or Look only after the Basic Correction tab produces an accurate, natural image.
- Match shots with Color Match: use the Comparison View to align tone and color across multiple clips in the same sequence.
- Save the grade as a preset: right-click the Lumetri panel to save a consistent look for reuse across future projects.
Can you skip color correction and go straight to color grading?
Skipping color correction and applying a creative grade directly to uncorrected footage produces unpredictable, often muddy results, since grading tools amplify existing exposure and white balance flaws instead of fixing them. A stable, corrected base is required for any creative LUT or color wheel push to behave predictably.
Do you need to color correct every clip in a video separately?
Yes, every clip needs individual color correction because lighting conditions, camera settings, and exposure vary shot to shot, even within the same scene. Shot matching then aligns the corrected clips so the sequence reads as visually consistent once creative grading is applied.
What software is best for color correction and grading?
DaVinci Resolve is widely regarded as the industry standard for color work, offering the same node-based Color page used on major film productions even in its free version, while Adobe Premiere Pro’s Lumetri Color panel suits editors who want correction and grading inside one editing timeline. Final Cut Pro and Avid also include capable, though less granular, color tools.
Why does my LUT look wrong when I apply it to my footage?
A LUT looks wrong when it is applied to footage in the wrong color space, most often when a creative LUT is dropped directly onto uncorrected log footage instead of footage already converted to Rec. 709. Convert log footage first, then apply creative LUTs on top of that corrected, normal-range image.
How much can color grading change the mood of a video?
Color grading can shift a scene’s entire emotional read, since warmer tones read as nostalgic or comforting while cooler, desaturated tones read as cold, tense, or unsettling. Directors use this deliberately; a documented example is a film using dominant reds in dramatic moments to signal passion or power.
Is color correction the same as auto color in editing software?
Auto color tools apply an automated baseline correction by analyzing the frame and adjusting exposure and white balance, but they rarely replace manual correction entirely. Most colorists use auto color as a fast starting point, then fine-tune white balance, exposure, and contrast manually against scopes for an accurate final result.